Thursday, December 31, 2015

Year in Review

I can't believe it's New Year's Eve already. 2015 has flown by so fast. I guess it's true that time really does pass by faster the older you get.

After having a record warm November and December (and a green Christmas), we finally got our snow the Monday after Christmas. We had an early snowstorm in November, but it quickly melted, and it was warm enough the weekend before Christmas that the boys and grandkids were outside playing football in short sleeves. Glad it's finally starting to act like winter.


Looking back over 2015 and our garden and my canning, I didn't get near enough done this year. It was a wet spring, so while we did get an early garden planted, not much grew this spring. I think this is the first year since Kevin and I have been married (23 years) that I didn't have any of our own tomatoes to can, and I had to buy green beans so I could can those. Thankfully one of Kevin's co-workers had some extra tomatoes, so I was able to put up some salsa. On the other hand, our apple and peach trees went berserk, so I was able to do a bunch of applesauce, pie fillings and jams to put on the shelves. All this means is that next summer we will have a huge garden, and I'll be canning up a storm to replace everything we'll eat this winter. The shelves should be pretty bare by then. Thank goodness I did extra last summer :)

I was also able to try several new canning recipes this year. With the boatload of apples, I tried a new apple pie filling, Caramel Apple Pie Filling, which is a new favorite in our house. I also finally got to try canning pickled mushrooms, and this is a recipe I'll be making a lot in the future.


This year we raised chickens, and while we lost a few along the way, we now have a full freezer, for which I'm very thankful. The guys were also successful fishing for catfish this summer, so there's plenty of that in the freezer as well. No venison this year, as they just didn't have any luck, but between the chicken, the catfish and the couple of huge turtles they caught, we aren't short of meat this year.

All in all, 2015 was a pretty good year. My family is healthy and happy. There's food on the shelves and in the freezer. Life is good. Happy New Year everyone!

Cheeseburger Mac Stew

All over the Internet I keep reading recipes for cheeseburger soup. My sister even makes a version of it, although I haven't had the privilege (yet) of tasting it. So, when I was trying to think of something different for dinner last night, I thought I'd try my hand at making this soup. A lot of the recipes I read online included hash browns, and since I didn't have any frozen hash browns on hand and didn't feel like making them from scratch (I was feeling lazy), I omitted them, but feel free to include some if you try this.

I will confess that I keep the dreaded "blue box" macaroni and cheese in my kitchen cupboards. While I make mac and cheese from scratch (and my husband and I don't particularly care for the store-bought stuff), my sons like to have the "blue box" on hand to make themselves a quick snack. I thought this recipe would be a good way to get rid of one of those boxes from my cupboards, and the cheese mix from the box did help thicken up the soup - hence I named the recipe cheeseburger mac stew.


Cheeseburger Mac Stew

3 cups chicken broth
2 large carrots, scraped and shredded
2 cups milk
1/2 box Velveeta cheese
1 pound hamburger, cooked and drained
1 box macaroni and cheese
Salt and pepper to taste

In a skillet, brown hamburger until no longer pink. Drain and set aside.

In a large stockpot, combine chicken broth and shredded carrots. Cook for 10 minutes, or until the carrots become tender. Add the milk, Velveeta and cheese mix package from the macaroni and cheese box. Stir until well combined and the cheese mix is dissolved. Add the cooked hamburger and the macaroni from the package. Cook until the macaroni is tender, about 8 minutes or so. Season with salt and pepper.

Tuesday, December 22, 2015

Christmas Cookies: Grandma's Orange Delight Cookies

I remember Grandma Decker making these orange-flavored cookies when I was a kid. They were a real treat, especially since my mom didn't make these very often. I remember when I was growing up that Mom would make these and then say they didn't turn out like her mother's did, not that I could tell any difference, but after a while she didn't make these any more.

I was talking to her about this recipe the other day, and she said she hadn't made them in years. I decided that if I could pull off the recipe, it would be a nice surprise for her this Christmas. These are a soft cookie, and the flavors develop nicely after the glaze has time to soak into the cookie. Final verdict after taste testing - they're just like Grandma used to make :)


Grandma's Orange Delight Cookies

For the Cookie Dough:

3/4 cup shortening
1 1/2 cup brown sugar
2 eggs
1 teaspoon good vanilla
1 1/2 teaspoon grated orange rind
3 cups all-purpose flour
1 1/2 teaspoons baking powder
1/4 teaspoon salt
1/2 cup sour milk (1/2 tablespoon of either white vinegar or lemon juice plus enough milk to equal 1/2 cup)
1/2 teaspoon baking soda

For the Glaze:

1 1/2 teaspoon grated orange rind
1/3 cup orange juice
1 cup sugar

Cream together shortening and sugar until combined. Add eggs, vanilla and grated orange rind, and beat until the mixture is smooth. Dissolve the baking soda in the sour milk, and add milk mixture to the batter. Slowly add the flour, baking powder and salt to the batter, and mix until well combined.

Drop dough by teaspoonfuls onto greased cookie sheets. Bake at 375 degrees Fahrenheit for 10 to 15 minutes. (Mine took 10 minutes.)

While the cookies are baking, combine all the glaze ingredients and set aside.

Remove the cookies from the oven, and while hot, spread the glaze on the cookies. The glaze makes a thin sugary coating over the cookies and must be put on the cookies as soon as they are removed from the oven.

Monday, December 21, 2015

Christmas Cookies: Chocolate Crinkles

While this isn't probably considered a traditional Christmas cookie, in my family we always have these chocolate crinkles on the cookie tray during the holidays. I remember a family friend making these when I was a kid, and my mom always included these at Christmastime. They're my oldest son's favorite cookie - well, anything with chocolate would probably be his favorite, but he always requests these for Christmas.


Chocolate Crinkles

1/2 cup vegetable oil
4 squares unsweetened chocolate, melted
2 cups sugar
4 eggs
2 teaspoons good vanilla
2 cups all-purpose flour
2 teaspoons baking powder
1/2 teaspoon salt
Confectioners' sugar for rolling

Mix together vegetable oil, melted chocolate and sugar. Add one egg at a time, mixing well between additions. Add vanilla.

In a separate bowl, combine flour baking powder and salt. Slowly add flour mixture to the chocolate mixture, and mix until smooth. Chill dough for several hours - overnight is fine too.

Preheat oven to 350 degrees Fahrenheit. Drop teaspoonfuls of dough into a cereal bowl that contains powdered sugar, and roll the dough balls until completely covered in sugar. Place 2 inches apart on greased cookie sheets.

Bake cookies for 10 to 12 minutes, or until almost no imprint remains when you lightly touch the cookie.

Makes about 6 dozen cookies.

Christmas Cookies: Nutmeg Logs

I come from a long line of bakers. My maternal grandmother always had cookies or a freshly baked cake when we'd come to visit. My paternal grandmother baked the most delicious breads, angel food cake and pies, especially mincemeat and cherry. But my mother was queen of Christmas cookies. She'd start baking after Thanksgiving, and by Christmas, she'd have several tins of cookies stored in the freezer just waiting for the holidays. When I moved out on my own, I tended to make candies and fudge for the holidays. I didn't need to make Christmas cookies because that's what Mom did. Of course, I'd make roll-out sugar cookies, and the boys and I would decorate batches every year, but I didn't do what I call Mom's "specialty" Christmas cookies. This year I decided it was time I did.

One of my favorite cookies that Mom always made was her Nutmeg Logs. I haven't seen this recipe on the Internet, not that it isn't out there somewhere. I'm not really sure where this recipe came from, but I'm betting it's my grandmother's or some other relative on Mom's side of the family. It's tasty, and it makes a lot of bite-sized cookies, and you can store them in the freezer until you need them.


Nutmeg Logs

For Cookie Dough:

1 cup butter, softened (not margarine)
2 teaspoons good vanilla
2 teaspoons rum flavoring (or dark rum if you prefer)
3/4 cup sugar
1 egg
3 cups all-purpose flour, sifted
1 teaspoon freshly grated nutmeg
1/4 teaspoon salt

For Frosting:
1/3 cup butter, softened
1 teaspoon good vanilla
2 teaspoon rum flavoring
2 cups confectioners' sugar
2 tablespoons light cream

Cream the butter with the vanilla and rum flavoring. Gradually beat in the sugar, and mix until well combined. Beat in the egg. Sift together the flour, nutmeg and salt. Slowly add the flour mixture to the butter mixture, and mix well.

Shape pieces of dough on a sugared board into long rolls that are 1/2-inch in diameter. Cut dough into 3-inch pieces, and place on a buttered cookie sheet. Bake at 350 degrees Fahrenheit for 12 to 15 minutes. Cool.

For the frosting, cream together the butter, vanilla and rum flavoring. Blend in the confectioners' sugar and light cream. Beat until smooth and creamy.

After the cookies have cooled, spread the frosting on the top and sides of each cookie. Mark cookies with the tine of a fork to resemble bark. Sprinkle lightly with freshly grated nutmeg.

Makes approximately 72 cookies

Sunday, December 20, 2015

Bacardi Rum Cake

There are lots of boozy cake recipes on the Internet, and this particular one may be out there too. I got this recipe over 30 years ago from a family friend, and it's been a favorite of mine since I was a kid. This cake is super easy to make, especially since it starts with a cake mix. Be sure to make the glaze for the cake - it makes all the difference in the world.


Bacardi Rum Cake

For the Cake:
1 cup chopped pecans or walnuts
1 package yellow cake mix (without pudding)
1 3 3/4-ounce package instant vanilla pudding
1/2 cup cold water
1/2 cup vegetable oil
1/2 cup dark Bacardi rum

For the Glaze:
1/2 cup butter
1/2 cup sugar
2 tablespoons water
2 tablespoons dark rum

Preheat the oven to 325 degrees Fahrenheit. Grease and flour a 10-inch tube or 12-cup Bundt pan. Add 1 cup of chopped pecans to the bottom of the Bundt pan, making sure they're evenly distributed.

Mix all the cake ingredients together. Pour batter into the Bundt pan, covering the nuts. Bake for 1 hour, or until the cake tests done.

After removing the cake from the oven, let it cool in the pan.

While the cake cools, make the glaze. In a small saucepan, melt the butter. Stir in the water and the sugar. Simmer for 5 minutes while stirring constantly. Stir in the rum.

Invert the cake onto a serving plate. Prick the top of the cake with a toothpick. Liberally spoon the glaze over the top of the cake so that it soaks into the cake.

Serve with whipped cream or ice cream if desired.

Saturday, December 19, 2015

Honey Cinnamon Cornbread Muffins

I was looking for a quick and easy muffin recipe to make a quick breakfast for the guys during deer season. I found this recipe on A Spicy Perspective. They're quick to mix up, and they taste great. The guys said I could make these again - a surefire hit for my family.


Honey Cinnamon Cornbread Muffins

1 1/4 cup plain yellow cornmeal
1 cup flour
1 tablespoon baking powder
1 teaspoon salt
1 teaspoon ground cinnamon
2 large eggs
1/2 cup honey
1 cup buttermilk
1 stick unsalted butter, melted

Preheat the oven to 350 degrees Fahrenheit. Grease muffin pans.

Whisk together the cornmeal, flour, baking powder and cinnamon until well combined. Whisk in the eggs, honey and buttermilk. Add the melted butter, and mix until the mixture is smooth.

Pour batter into prepared muffin pans, filling only 2/3 full. Bake for 20 minutes, or until the tops are golden brown.

Yield: Approximately 15 muffins

Sunday, December 13, 2015

Canning 101: Homemade Horseradish

My husband likes to make homemade horseradish. He may not make it every year, depending on how quickly we go through it, but it's something that's easy to make, although it will "scent up" your kitchen if you work it up inside :) He got his recipe from a co-worker, and it's a good one to have on hand, especially if you grow your own horseradish like we do.

In the fall, dig up the horseradish roots - as much as you want to prepare. Kevin always digs in late fall, and this year he was able to wait until Dec. 11 as it stayed warm enough that the ground hadn't frozen, and he could still get the spade in the ground. Here's one of the largest roots he dug up this year:


After digging the roots, cut off the crowns, but don't throw them away. You can save them and replant in the spring, or share with your family and friends so they can start their own horseradish patch in the garden. Scrape or peel the roots as you would a carrot.


Cube up the roots into manageable pieces, small enough that they won't ruin a food processor. Believe me, these roots are tough, and we've gone through several commercial-grade food processors making horseradish in the past.

To each cup of cubed horseradish root you add to the food processor, add 1 cup of white vinegar and 1 teaspoon sugar. Pulse the ingredients until smooth and creamy. You'll want to have an open window in the room you're working - when you open up the lid to the food processor, you'll understand why :)

Pour prepared horseradish into clean pint jars. Add lids and rings. Store horseradish in the refrigerator.


When horseradish is fresh, it will be snow white in color, and as it ages, it turns creamy white in color. The intensity of the flavor will mellow as it ages, but this keeps for several months in the refrigerator. Use it as you would use store-bought horseradish: in cocktail sauce (add to ketchup) or add to mayonnaise and sour cream to make a tasty dipping sauce for prime rib or roast beef. I even use it in my barbecue sauce for a little extra kick. Enjoy!

Tuesday, December 8, 2015

Pumpkin Cheesecake

Everyone knows it's not Thanksgiving dinner without dessert. In my house, my sons and husband love pumpkin pie, but I'm not the biggest fan. Maybe I ate too much of it as a kid. I do, however, love cheesecake, so when I'm asked to make a pumpkin dessert, I generally make pumpkin cheesecake. You still get the pumpkin flavor - but I get the cheesecake part I love.


Pumpkin Cheesecake

Crust:
2 cups crushed graham crackers
2 tablespoons sugar
8 tablespoons butter, melted

Filling:
3 packages cream cheese, at room temperature
1 1/2 cups sugar
4 eggs, at room temperature
1 carton ricotta cheese
1 pint sour cream
1 can pumpkin puree
1 tablespoon good vanilla

Preheat oven to 350 degrees Fahrenheit.

Combine the crust ingredients in a bowl, and mix thoroughly. Press into the bottom and halfway up the sides of a 10-inch springform pan. Cover the bottom and sides of the springform pan with aluminum foil. Set aside.

In a large mixing bowl, combine the softened cream cheese with the sugar. Mix on high until well combined and fluffy in appearance. Add the eggs one at a time, mixing well between each addition. Add the ricotta cheese, sour cream, pumpkin puree and the vanilla. Turn the mixer on low speed at first, gradually increasing the speed to high as you incorporate all the ingredients together. Mix until everything is well combined and the mixture is smooth.

Pour the filling into the prepared springform pan. Place the springform pan inside a larger pan (I use a roasting pan). Add hot water to the larger pan until the water level is about halfway up the sides of the springform pan.

Bake cheesecake at 350 degrees Fahrenheit for 1 hour. After an hour, turn off the heat, but let the cheesecake sit in the oven for an additional hour.

Remove from the oven, and cool before refrigerating. For best results, let the cheesecake cool in the refrigerator at least 8 hours or overnight before serving.

Sauteed Brussels Sprouts with Bacon

A favorite Thanksgiving side dish in our house is sauteed Brussels sprouts. I'm a lucky parent as my sons will eat just about anything - from liver and onions to spinach and these Brussels sprouts.

We like sauteed cabbage, and since Brussels sprouts are in the same vegetable family, one year I decided to try sauteeing some. Add some bacon and dried cranberries, and you've got the perfect side dish for your Thanksgiving dinner.


Sauteed Brussels Sprouts with Bacon

1 pound fresh Brussels sprouts, washed, trimmed and sliced in half
5 bacon strips, diced and cooked
1/2 small onion, diced
6 tablespoons butter
1/2 cup dried cranberries
Salt and black pepper to taste

In a large skillet, melt the butter over medium-high heat. Add the sliced Brussels sprouts and diced onions. Cook the vegetables over medium heat, stirring frequently, until the Brussels sprouts are nicely caramelized and the onions are soft. Add the cooked bacon pieces and the dried cranberries, stirring to incorporate and heat through. Season with salt and pepper to taste. Serve warm.

Mushroom Dressing

I hope everyone had a terrific Thanksgiving this year. We did, as we visited my parents for a short weekend. Lots of good food and conversation.

I'm late getting these recipes posted, as work has been a crazy, busy mess. I'm not complaining a bit, though. Being a freelancer, you take the work when it presents itself. It just has kept me too busy to blog this past month.

One of my favorite Thanksgiving recipes is mushroom dressing. I'll admit I'm not a huge stuffing fan, probably because most recipes use celery. I like celery - just not in my stuffing thank you. About 20 years ago or so, I found a recipe for mushroom dressing in the Des Moines Register. I've made this recipe hundreds of times and have tweaked it along the way from the original one I first saw. My family likes this version, and I hope you do too.


Mushroom Dressing

1 pound fresh mushrooms, chopped
1/2 cup onion, finely chopped
8 tablespoons butter
3 cups chicken stock
2 packages of stuffing mix (plain, herbed or use day-old homemade bread cubes), about 5 cups
1 8-ounce can water chestnuts, chopped
2 teaspoons poultry seasoning (omit or reduce amount if using seasoned bread cubes)
Salt and black pepper to taste

In a large skillet, melt the butter. Add the sliced mushrooms and sliced onions. Cook over medium heat until the mixture reduces and the mushrooms and onions are soft, about 15 minutes.

In a large mixing bowl, combine the bread cubes (or stuffing mix) with enough chicken stock to thoroughly moisten the bread. Add the cooked mushrooms and onions, the poultry seasoning if using, and the chopped water chestnuts. Stir until well combined and everything is moistened. Add salt and pepper to taste.

Place dressing mixture in a greased 9 x 13-inch baking pan. Bake at 325 degrees Fahrenheit for 20 to 30 minutes, or until the top is nicely browned.

Saturday, November 14, 2015

Unstuffed Cabbage

I had a really great meal planned for dinner. I was going to make traditional cabbage rolls, something I hadn't eaten for a long time, probably since my grandmother was alive. I'd found a really nice head of cabbage at the grocery store and had everything planned out for the meal - and then work got in the way. I love working from home, but sometimes work can get crazy with deadlines and tasks that need to be managed. So my wonderfully planned meal went out the window.

But I still had all the makings for cabbage rolls, just not all the time I needed. Cabbage rolls generally take about 2 hours to bake and about 30 minutes or so for the prep work. I was still hungry for the taste of a cabbage roll, so I decided to make unstuffed cabbage in a big skillet instead. It uses all the same ingredients, but dinner can be ready in about half an hour. Win-win for me!

I used Minute Rice in this recipe simply because I was pressed for time in getting something on the table for everyone to eat, but you can definitely use the long-grain rice of your choice. You'll just need to extend the cooking time to allow the rice to cook. I also added a pint of homemade salsa to my skillet unstuffed cabbage. Salsa isn't a usual ingredient in traditional cabbage rolls, but it adds a nice spicy flavor when you're making it on the stove top.


Unstuffed Cabbage

1 pound ground beef
1/2 an onion, diced
1/2 head green cabbage, chopped
2 15-ounce cans tomato sauce
1 pint salsa (optional)
2 cups Minute Rice (or your favorite long-grain rice but add more cooking time)
2 cups water
Salt and pepper to taste

In a large skillet, brown ground beef with the onion until the beef is no longer pink. Drain. To the skillet, add the chopped cabbage, and stir to combine. Let it cook for a few minutes to let the cabbage wilt a bit (and make more room in the skillet). Add the tomato sauce, salsa if using, 2 cups of rice and 2 cups of water. Stir to combine everything.

Let cook over medium heat for about 15 to 20 minutes, or until the rice has absorbed all the water and the cabbage is tender. If you're using long-grain rice, the cooking time may be closer to 30 minutes. Stir frequently to avoid anything sticking in the bottom of the pan. Season with salt and pepper to taste.

Monday, November 2, 2015

Spinach Lasagna

My family would eat pasta just about every night of the week if that's what I made. Well, maybe not Kevin so much, as he's a traditional meat-and-potatoes kind of guy, but my sons would. They frequently ask for lasagna, and when they were little, I used to add fresh spinach to my lasagna to "sneak" in a few more vegetables into their diet - not that they didn't ever eat their veggies, but it was just one more way to get some greens in them. Now my oldest son requests that I include spinach when I make a lasagna, so I guess my sneaky ingredient somehow became his favorite way to eat lasagna.

To me the best lasagna has a ton of cheese in it, so I use lots of different blends in my recipe. For the ground meat, I've used ground venison, ground beef, Italian sausage and a combination of all. My oldest son likes it best when I use a combination of ground beef and ground Italian sausage, so this recipe reflects that.


Spinach Lasagna

1 package lasagna noodles, cooked according to package directions, cooled
1 pound ground beef
1 pound ground Italian sausage
1 small onion, diced
16 ounces diced mushrooms (store-bought canned, fresh or home canned)
2 jars spaghetti sauce (store bought or home canned)
1 8-ounce can tomato paste (I used Italian-seasoned tomato paste)
8 ounces ricotta cheese or small-curd cottage cheese
1 egg, slightly beaten
1/2 cup grated Parmesan cheese
1 teaspoon garlic powder
1 teaspoon parsley leaves
1 teaspoon Italian seasoning
1/2 teaspoon salt
1 package fresh spinach leaves, washed and patted dry
2 cups shredded Italian cheese blend
2 cups shredded mozzarella cheese, divided
8 ounces sliced Provolone cheese
Freshly grated Asiago cheese
Freshly grated Parmesan cheese

Cook lasagna noodles per package directions. Set aside.

In a large skillet, brown ground beef and Italian sausage with the diced onions until the meat is no longer pink. Drain grease. In the same skillet, to the browned meat add 1 jar of spaghetti sauce, the tomato paste and the mushrooms. Cook until the mixture thickens.

In a large bowl, combine the ricotta or cottage cheese, egg, 1/2 cup Parmesan cheese, garlic powder, parsley, Italian seasoning and salt. Stir until well combined.

Combine the 2 cups of Italian shredded cheese and 1 cup of the shredded mozzarella cheese in another bowl.

In a large lasagna pan, layer the bottom with cooked lasagna noodles. Spoon some of the meat mixture on top of the noodles. Add a layer of the sliced Provolone cheese. Add a layer of the ricotta/egg mixture over the sliced Provolone. Add a layer of spinach leaves. Add a layer of the combined shredded cheeses.

Repeat layers, starting with another layer of noodles, and continue until you've used all the noodles, meat mixture, ricotta cheese mixture, spinach and combined shredded cheeses.

After you've completed all the layers, pour the remaining 1 jar of spaghetti sauce over all the layers. Top the sauce with the remaining 1 cup of shredded mozzarella cheese and additional freshly grated Asiago and Parmesan cheeses, if desired.

Bake the lasagna in a 350 degrees Fahrenheit oven for about 60 minutes, or until the cheese is browned and the lasagna is bubbly.

Serve with additional grated Parmesan and Asiago cheeses.

Dark Chocolate Kahlua Cheesecake

Years ago I sold cheesecakes for holidays and special occasions, and I even catered a couple of weddings where the bride didn't want a traditional wedding cake. I've tried many different cheesecake recipes, and I have lots of favorites. I haven't made cheesecake for a while, and my sons were complaining about that fact, so for my birthday I decided it was time to try my hand at baking another cheesecake.

I usually opt for a traditional New York-style cheesecake, but I was hungry for chocolate, so I used my basic cheesecake recipe and tweaked it a bit to incorporate both dark chocolate and Kahlua. I used a basic graham cracker crust, but you could make this a decadent chocolate cheesecake by using chocolate cookie wafers in place of the graham crackers. As cheesecake isn't a low-calorie dessert, and it's a treat I don't make all the time anyway, I don't worry about using low-cal this or that for my ingredients. I use full-fat cream cheese, real butter, good Mexican vanilla and the best chocolate I can find. I used Ghirardelli intense dark chocolate (86% cacao) for this recipe.

The overall texture of this cheesecake is light and fluffy, not heavy as some cheesecakes can be. Neither the chocolate nor the coffee flavors are overpowering but balance nicely with each other. The boys said this recipe was a definite keeper.


Dark Chocolate Kahlua Cheesecake

For the Crust:
2 cups graham cracker crumbs
2 tablespoons sugar
1/2 cup butter, melted

For the Filling:
3 8-ounce packages cream cheese, at room temperature
1 1/2 cups sugar
4 eggs, at room temperature
1 teaspoon good vanilla extract
1/2 cup butter, melted and cooled
3 ounces good dark chocolate, melted
1/4 cup Kahlua liqueur, or other coffee-flavored liqueur
1 pint sour cream

Prepare a 9- or 10-inch springform pan by wrapping the bottom and sides of the pan with foil. Preheat the oven to 350 degrees Fahrenheit.

For the crust, combine graham cracker crumbs, 2 tablespoons sugar and 1/2 cup melted butter. Mix until well combined. Press into the bottom and halfway up the sides of the prepared springform pan. Set aside.


For the filling, whip the room-temperature cream cheese until fluffy, about 2 to 3 minutes. Add in the 1 1/2 cups sugar, and mix until well combined. Add in the eggs, one at a time, mixing well after each addition. Add in the vanilla, melted 1/2 cup butter, melted chocolate and Kahlua. Mix on low speed for 1 minute, then mix well on medium-high speed for about 3 minutes. Add the sour cream to the batter, and mix until well combined, about another 2 minutes. The batter should be creamy and fluffy.

Pour the cheesecake batter over the crust in the springform pan. Place the springform pan inside a larger roasting pan or cake pan (I use my large lasagna pan). Pour boiling water into the roasting pan until it is halfway up the sides of the springform pan.


Bake the cheesecake at 350 degrees Fahrenheit for 1 hour. After 1 hour, turn off the oven, and leave the cheesecake in the oven for an additional hour. This helps keep the top from cracking.

Allow the cheesecake to cool completely in the refrigerator before serving (at least 8 hours or overnight). Top with your choice of fruit toppings (raspberry is awesome) or freshly whipped cream if desired.

Saturday, October 31, 2015

Shrimp Scampi

I've always said I'd love to live on the coast where I could have access to fresh seafood any time. It's one of my favorite things to eat, but here in the Midwest it can be expensive, so we usually only have it as a treat on special occasions. While Kevin and the boys would probably choose crab or lobster as their first seafood choice, mine would definitely be shrimp. I love shrimp however it's prepared, and shrimp scampi is one of my favorite ways to prepare it at home.


Shrimp Scampi

2 pounds raw shrimp, peeled and deveined
1 stick butter
Half a small onion, finely diced
3 garlic cloves, finely minced
1/2 cup dry white wine
2 tablespoons chopped parsley
Salt and pepper to taste
Grated Parmesan cheese for garnish
Hot noodles or rice

In a large skillet, melt the butter. Cook the diced onions for about 2 minutes, and add the minced garlic. Cook a few minutes more until the onion is translucent but not browned. Add the chopped parsley and white wine, stirring to combine.

Add the peeled and deveined shrimp to the skillet, and cook just until all the shrimp have turned pink -- no longer or they will turn tough.

Serve shrimp and sauce over hot cooked noodles or rice, and garnish each serving with grated Parmesan cheese.

Sunday, October 25, 2015

Sour Cream Raisin Pie

I love to eat just about any kind of pie, but I don't often make them, mostly because I hate making pie crust. I can do it, but it's not my speciality. Ask me to make a pie filling (or cake or cheesecake), and I can do that no problem. My husband and our oldest son are whizzes at making pie crusts, so when I can sweet talk them into making the crust, I'll do the filling.

Today we wanted pie, and I cheated and used store-bought crust. It's okay - really. It just won't have the nice flaky outcome like Grandma makes. I won't even say crust like my mom makes, because she has the same pie crust problem I have (sorry Mom!). She's a great cook and baker, but pie crust just isn't her thing either.

One of our favorites is sour cream raisin pie, so I thought I'd share our recipe with you. You can top the pie with meringue if you wish, but I like this raisin pie with fresh whipped cream on top. This makes a 10-inch pie. I have large glass pie pans, and this may be too much filling for a normal-sized 9-inch pan.


If you promise not to laugh too hard at this picture, which shows the obvious store-bought pie crust, here's what it looks like just out of the oven. It's not the prettiest pie, but boy does it taste good :)


Sour Cream Raisin Pie

Pastry for 1 pie crust, chilled
4 eggs
1 1/2 cups sugar
1/2 teaspoon salt
1 teaspoon cinnamon
1/2 teaspoon nutmeg
1/4 teaspoon ground cloves
1 teaspoon good vanilla extract
2 cups sour cream
1 1/2 cups raisins

Place chilled pastry in a 10-inch pie pan. Beat eggs lightly, then stir in sugar, salt, cinnamon, nutmeg and cloves. Stir in vanilla, sour cream and raisins, and mix until well combined.

Pour mixture into the chilled pastry shell. Bake in a 450 degrees Fahrenheit oven for 10 minutes, then reduce the heat to 350 degrees Fahrenheit, and bake for an additional 30 minutes, or until the pie tests clean in the center.

Let cool to room temperature, or chill for a few hours. Serve with whipped cream.

Saturday, October 24, 2015

Buttermilk Pancakes

Nothing is better on a chilly fall weekend morning than pancakes. They're one of my sons' favorite things to eat, and they often make them when they've got time to cook on the weekend.

I've tried lots of different pancake recipes over the years, but this one is probably my favorite.


Buttermilk Pancakes

2 cups all-purpose flour
1 teaspoon salt
2 teaspoons baking powder
1 teaspoon baking soda
2 tablespoons sugar
2 cups buttermilk
2 eggs
1 teaspoon good vanilla
1/4 cup canola oil
Butter for griddle or skillet

In a large bowl, whisk together the flour, salt, baking powder, baking soda and sugar. In another bowl, combine the buttermilk, eggs, vanilla and canola oil, and stir to combine. Add the wet mixture to the flour mixture, and stir until just combined.

Heat the griddle or skillet over medium-low heat, and coat the griddle with butter. Pour 1/3 cup pancake batter onto the griddle, and cook until bubbles form along the edge of the pancake, about 2 to 3 minutes. Flip the pancake, and cook for an additional 2 to 3 minutes.

Remove from the griddle and keep warm in a 200 degrees Fahrenheit oven until all the pancakes are made.

Friday, October 16, 2015

Cheddar Cheese Beer Soup with Sour Cream, Cheese and Garlic Drop Biscuits

I love cheese soup, and although I've eaten a lot of it in restaurants over the years, I've never made it at home. I decided it was high time I did, so that's what we had for dinner tonight along with some sour cream, cheddar cheese and garlic drop biscuits. The boys said they both were great, and I could make both again any time.


Cheddar Cheese Beer Soup

1/4 cup butter
1 small onion, diced
1/4 cup all-purpose flour
1 1/2 teaspoons dry mustard
2 cups milk
2 cups chicken stock
12 ounces of your favorite beer
1/4 teaspoon cayenne pepper
2 teaspoons Worchestershire sauce
1 teaspoon salt
Freshly ground black pepper, to taste
3 cups shredded cheddar cheese

In a large stockpot, melt the butter and add the diced onion. Cook over medium-low heat until the onions are translucent but not browned.

Add in the dry mustard and flour, and stir to combine. Cook for a few minutes to form a roux.

Add the milk, chicken stock and beer. Add the cayenne pepper, Worchestershire sauce, salt and black pepper, and stir to combine. Simmer for about 5 minutes.

Add the shredded cheddar cheese. Cook over medium heat, and stir frequently until the cheese is completely melted. Adjust salt and black pepper as needed.

_____


Sour Cream, Cheddar Cheese and Garlic Drop Biscuits

2 cups all-purpose flour
1 tablespoon sugar
2 teaspoons baking powder
1/4 teaspoon baking soda
3/4 teaspoon salt
1/2 teaspoon garlic powder
1/2 teaspoon black pepper
4 tablespoons frozen butter, grated
1/2 cup shredded cheddar cheese
1 cup milk
1/2 cup sour cream

Preheat the oven to 450 degrees Farhenheit. Line a baking sheet with parchment paper, or spray with cooking spray.

In a large bowl, combine the flour, sugar, baking powder, baking soda, garlic powder, salt and black pepper./ Cut in the grated butter, and combine until the mixture resembles coarse meal.

Add the shredded cheddar cheese, and toss to combine.

Stir in the milk and the sour cream. Stir until just combined; don't overmix.

Drop dough by tablespoonfuls onto prepared baking sheet. Bake at 450 degrees Farhenheit for 12 to 15 minutes, or until the biscuits are golden brown.

Chicken Pot Pie in a Crock-Pot

I was busy working away today when I looked at the clock and saw it was nearly the middle of the afternoon. And I hadn't started anything for dinner yet. Technically I had - I got out some frozen chicken breasts in the morning to thaw, but I hadn't decided what I was going to do with them.

So I turned to Pinterest, as I often do, for a little inspiration on what to do with this chicken. I saw a post about chicken pot pie done in the Crock-Pot, and I had my answer. Rummaging through my cupboards and freezer for the veggies, I had everything I needed to put together a quick yet tasty meal for my family. I just dumped everything in the Crock-Pot and went back to work. Easy peasy :)


Chicken Pot Pie in a Crock-Pot

5 to 6 frozen chicken breasts
1 can condensed golden mushroom soup
1 can condensed cream of chicken soup
1 can condensed cream of mushroom soup
5 to 6 red potatoes, diced (peeled or unpeeled - your choice)
4 cups frozen peas and carrots
Salt and pepper to taste
1 teaspoon garlic powder
1 teaspoon onion powder
2 teaspoons dried parsley flakes
Hot biscuits (homemade, store bought or out of a can)

Layer the frozen chicken breasts in the bottom of the Crock-Pot. Add potatoes, frozen veggies, soups, seasonings and mix well.

Cook on low for 6 to 8 hours, or on high for 4 to 5 hours, until the chicken is fully cooked. Be sure to break up the chicken into bite-sized pieces after it has cooked.

Serve over hot biscuits.

_____


When I pulled up my usual biscuit recipe, I realized I was out of milk. That sent me on an online search for a no-milk biscuit recipe. I found one on Cooks.com, and they turned out great.

No-Milk Biscuits

2 cups flour (all-purpose or bread flour)
3 teaspoons baking powder
1/2 teaspoon salt
6 tablespoons canola oil or soft shortening
3/4 cup water

Mix all ingredients together. Add additional flour to knead easily. Knead dough on a floured surface for about 30 seconds. Roll dough out to 1/2-inch thickness, and cut with a small cutter. Place on an ungreased cookie sheet, and bake at 450 degrees Fahrenheit for 10 to 12 minutes, or until biscuits are golden brown.

Yield: 12 biscuits

Wednesday, October 14, 2015

Canning 101: Easy Applesauce

It's apple season here in eastern Iowa, and I've already made some caramel apple pie filling, but I have scads of apples yet to work with. I haven't made applesauce in years, so I thought it was high time I did. Our sons love it, as do our granddaughters, so I know I won't have any problem getting rid of it.:)


Applesauce

20 pounds apples, cored and sliced
2 cups apple juice, apple cider or water
1 cup packed brown sugar
2 teaspoons cinnamon

Place cored and sliced apples and the 2 cups of liquid in a large stockpot, and cook the apples until they're soft and mushy, approximately 20 to 25 minutes. Using a food processor or stick blender, blend the apples until you reach the consistency you want. I like smooth applesauce, so I blended for approximately 7 to 8 minutes. Add the brown sugar and cinnamon, and stir the apple mixture until everything is well combined.

Pour hot applesauce into sterilized, hot pint jars. Process in a water bath canner for 20 minutes.

Yield: 13 pints

Tuesday, October 13, 2015

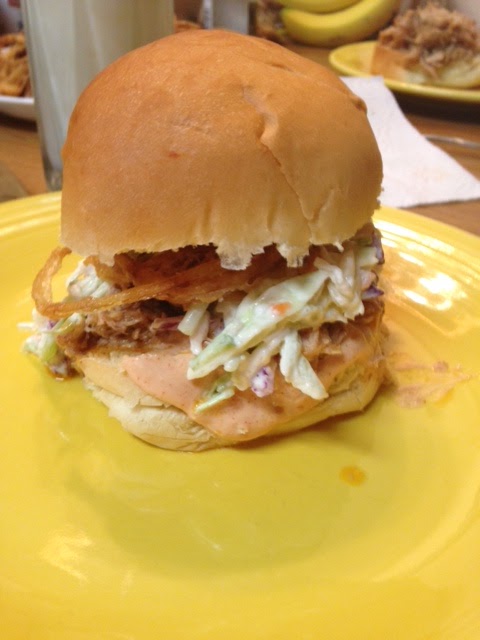
CrockPot Pulled Pork, Onion Strings and Dipping Sauce

After finding a nice buy at the grocery store on some pork shoulders, I decided to make some pulled pork in the Crock-Pot. When we have time, Kevin likes to smoke these on the smoker, but when we don't have a lot of time, the Crock-Pot is a great way to get the same flavors without having to stand guard while it cooks.

I decided to use a dry rub on this pork shoulder and let the meat simmer in some apple cider vinegar. You can pass your favorite barbecue sauce at the table if you wish, but it's great just as is.

Along with the pulled pork, I fixed a broccoli coleslaw and onion strings with a spicy dipping sauce similar to what you'd get in a steakhouse. I've listed the recipes separately, but my sons informed me you have to pile everything together on the pulled pork sandwich to make the perfect bite.


My sandwich:


Crock-Pot Pulled Pork

4- to 6-pound pork shoulder
1 cup apple cider vinegar
1 cup water
1/4 cup paprika
2 tablespoons packed dark brown sugar
1 tablespoon sugar
2 tablespoons salt
1 teaspoon black pepper
1 teaspoon cayenne pepper
1 teaspoon garlic powder
1 teaspoon onion powder

Trim off any excess fat from the pork shoulder. Mix together all dry ingredients, and rub onto all sides of the pork shoulder.

Pour the apple cider vinegar and water into the Crock-Pot, and add the pork shoulder. Cook on low for 8 hours, or until the meat easily comes off the bone.

Shred the meat. Serve on buns with barbecue sauce if desired.
______

We recently got a new counter-sized deep fryer, and we've been trying all sorts of delicious recipes. When Kevin came home from work with some huge Vidalia onions (thanks Jeff!), I decided we needed to try Ree Drummond's (The Pioneer Woman) recipe for Onion Strings. You can fry up as many onions as you wish - just adjust the ingredients to make sure you have enough flour mixture to coat all your onions. We love onion rings and strings in all shapes and forms, and this recipe is a definite keeper.


Onion Strings

1 whole large onion
2 cups buttermilk
2 cups all-purpose flour
1 tablespoon salt
1/2 to 1/2 teaspoon cayenne pepper
Oil for frying, between 1 to 2 quarts depending on the equipment in which you're frying the onions
Salt and black pepper to taste

Slice onions very thin. Place in a baking dish, and cover with buttermilk. Soak onions for at least an hour.

Combine dry ingredients, and set aside.

Heat oil to 375 degrees Fahrenheit.

Place the onions in the seasoned flour mixture, and coat completely. Shake off any excess flour. Add the onions to the hot oil. Fry for a few minutes, and remove from the oil as they turn golden brown. Season to taste with salt and black pepper.

_____

For the onion dipping sauce, I combined a couple recipes I'd seen to get the taste I was looking for. It has just enough spice so you can taste it, but it doesn't overpower the taste of the onion strings. You can halve this recipe if just using it to dip onion rings, but the boys wanted sauce to use on their pulled pork sandwiches, so this makes quite a bit of dipping sauce.

Onion Dipping Sauce

2 cups mayonnaise
2 tablespoons chili sauce
1 tablespoon ketchup
1 tablespoon sour cream
1/2 teaspoon paprika
1/2 teaspoon garlic powder
1/2 teaspoon cayenne pepper
1/2 teaspoon salt

Combine all ingredients, and chill in the refrigerator for at least an hour to allow the flavors to marry together.


Sunday, October 11, 2015

Canning 101: Caramel Apple Pie Filling

Fall is apple season on our little homestead, and when we're blessed with an overabundance of apples like this year, I make apple pie filling. I decided to change up my usual pie filling recipe by substituting brown sugar for half of the sugar in my normal recipe. This makes a delicious caramel filling that goes great with apples.


Caramel Apple Pie Filling

6 to 7 pounds apples, peeled, cored and sliced
Fruit Fresh or lemon juice to treat apples
2 1/2 cups sugar
2 1/2 cups packed dark brown sugar
1 cup ClearJel
1 tablespoon cinnamon
1/4 teaspoon nutmeg
1 teaspoon salt
2 tablespoons white vinegar
10 cups water

Peel, core and slice apples. Treat with Fruit Fresh or lemon juice to prevent browning.

In a large stockpot, combine both sugars, ClearJel, cinnamon, nutmeg, salt, vinegar and water. Stir until combined. Heat over medium-high heat until the mixture thickens slightly.

Pack apples into hot quart jars, and pour the hot syrup over the apples, leaving 1/2-inch headspace. Process jars in a boiling water bath for 20 minutes.

Yield: 7 quarts

Canning 101: Mushrooms

Today my husband decided to take a little stroll in the timber, and he came back with a really nice hen of the woods mushroom. We forage both in the spring and in the fall for wild mushrooms, and hen of the woods can be found in late fall, usually right before frost, providing the conditions are right.

The one he found today is a really nice one at 10 pounds. Not the biggest he's ever found, but also not the smallest. It will take a few jars to get this sucker canned. :)


These mushrooms are pretty much solid all the way through. You do need to trim off the bottom where it sits on the ground, and check for bugs and other critters as you cut it up and clean it. If you find them fresh like this one is, there's a lot of good eating.


While I realize that the current edition of Ball Blue Book doesn't condone canning wild mushrooms, older versions of this publication had no warnings against it, which is when I learned how to can what we would find. You have to know what you're foraging for, as there are mushrooms out there that may look similar but are deadly, not so much the hen of the woods but especially other types of fall mushrooms that we like to look for. My husband and I have hunted wild mushrooms for decades, so we know what is good to eat and what will kill you, and we've researched all kinds of mushrooms in various publications. That said, if you're going to hunt for wild mushrooms, if you're a newbie take someone with you who has experience and knows what the good ones look like.

Mushrooms must be pressure canned because mushrooms are a low-acid food, and these aren't being pickled (pickled mushrooms can be water bathed). A water bath canner doesn't get the temperature high enough to kill off any potential bacteria (botulism). Again, this isn't an approved Ball Blue Book recipe so proceed at your own risk, but I've pressure canned mushrooms this way for over 20 years, and I'm still here. I found these instructions in my Mirro canner manual, which I purchased over 20 years ago. Use half-pints or pint jars only, as using quarts isn't recommended.

For this 10-pound mushroom, I ended up with 25 half-pints of canned mushrooms. Nice return for a stroll in the woods. :)


Canning Mushrooms

Wild mushrooms
Water
Canning salt

Trim mushrooms of any debris, and soak in cold water for 10 minutes. Drain and rinse mushrooms. For hen of the woods mushrooms, dice mushrooms into bite-sized pieces.


In a large stockpot, cook mushrooms gently for 15 minutes.


Pack hot mushrooms into prepared hot jars, and cover with boiling water, leaving 1/2-inch headspace. Add canning salt to each jar (1/4 teaspoon for half-pints, 1/2 teaspoon for pints). Adjust lids and rings.

Process jars in a pressure canner at 10 pounds of pressure for 30 minutes (same time for both half pints and pints).

After processing, remove jars from canner, and let sit undisturbed for at least 12 hours before moving.

To use: You can use these mushrooms in any recipe that you would normally use store-bought canned mushrooms.


Friday, October 9, 2015

Venison Chili

The beauty about canning your own garden vegetables, making your own chili beans and canned black beans, and having men in the house who hunt means that I almost always have the ingredients in my cupboard to make venison chili. My husband and sons hunt deer, and when they are successful, we often can deer meat. It's a great addition to chili. We always grow tomatoes, both slicers and cherry tomatoes, and I can these as well. I've recently been canning my own chili beans and black beans, which I've always added to my version of chili, so it makes sense for me to have a bunch of these in my cupboard too.

When I make venison chili, it's simply a "dump" recipe. Grab the quarts and pints needed off the shelves, and dump everything together in a large stockpot. Heat and serve - easy peasy!

If you don't have canned venison, you can always substitute your favorite protein - beef, chicken or pork. However you make it, when you have canned items in your pantry, dinner is on the table in a flash.


Venison Chili

1 quart canned venison
1 quart canned tomatoes (whole or cherry tomatoes)
2 pints canned chili beans
1 pint canned black beans
Additional chili powder (optional)
Shredded cheddar cheese and sour cream for serving (optional)
Salt and pepper to taste

In a large stockpot, combine the canned venison (or other protein - browned and drained). Add the tomatoes, chili beans and black beans. Heat over medium-high heat until everything is heated through. Taste and add additional chili powder, salt and pepper as desired.

To serve, sprinkle shredded cheddar cheese over each bowl of chili, and top with a dollop of sour cream if desired.

Thursday, October 8, 2015

Italian Chicken, Spinach and Pasta Bake

Normally I cook using ingredients I have on hand, whether it's something I have growing in the garden or that I've canned/frozen during harvest. I do collect recipes, but I mainly get ideas from them (rather than follow them exactly), and I usually put my own twist on the recipes I see.

For tonight's dinner, I had chicken breasts and bow tie pasta on hand, so I went searching for something different to make. I decided to do an Italian-style casserole because I love casseroles, and a casserole plus a salad and freshly baked bread usually feeds my hungry family - and when you have two young men (21 and 17) plus a husband with healthy appetites, you quickly learn to make large portions. While I used bow tie pasta, any small-shaped pasta works well with this recipe.


Italian Chicken, Spinach and Pasta Bake

1 box (12 ounces) bow tie-shaped pasta, cooked according to package directions
2 chicken breasts, diced into bite-size pieces
2 tablespoons Italian seasoning
Half a small onion, about 1/4 cup, diced
Garlic-infused olive oil
Salt and black pepper
10 ounces chopped frozen spinach, thawed and drained of excess water
8 ounces fresh mushrooms, chopped (or use canned mushrooms)
1 jar good quality spaghetti or marinara sauce (or use homemade)
8 ounces cream cheese, softened
8 ounces mozzarella cheese
Parmesan cheese

Cook pasta according to package instructions; set aside.

Season the chicken pieces with the Italian seasoning, combining to coat the pieces well. In a large skillet, drizzle a few tablespoons of the garlic-infused olive oil, and cook the chicken pieces and diced onion over medium-high heat until the chicken is nicely browned and the onions are translucent, about 5 to 7 minutes. Drain any excess oil, and season with salt and black pepper to taste.

In a large bowl, combine the cooked chicken, thawed chopped spinach, mushrooms, cooked pasta and cream cheese. Stir to combine. Add the spaghetti sauce, and stir until all the ingredients are evenly coated.

Pour the chicken and pasta mixture into a greased 9 x 13-inch baking dish. Top the casserole with the 8 ounces of mozzarella cheese. Bake at 350 degrees Fahrenheit for 30 to 40 minutes, or until the cheese is nicely browned and the casserole is bubbling. To serve, grate fresh Parmesan over the top of each serving.

Wednesday, October 7, 2015

Roasted Chicken with Herb Butter, Onions and Garlic

Nothing says traditional family dinner to me more than having chicken on the menu. My favorite memories growing up were having fried chicken at my grandmother's house, along with her baked mac and cheese, fresh cherry pie and homemade ice cream. While I love fried chicken, to me roast chicken is pure comfort food.

Like my grandmother did, we raise our own chickens for both meat and eggs. The taste is beyond compare to what you can buy in the grocery stores. Kevin loves to barbecue chicken, but my favorite way to prepare the birds is through roasting. You can do any flavor profile you want, from Cajun to French or just plain salt and pepper. All you need is a pan large enough to hold the bird and a hot oven.

This recipe is super simple. Fresh herbs are best, but if you use dried herbs, just cut back a bit on the amounts. You can definitely eat the onions and the garlic after the dish is finished (Kevin and the boys did), but I primarily added these to flavor the sauce and flavor the bird from the inside out.


Roasted Chicken with Herb Butter, Onions and Garlic

8 tablespoons unsalted butter, at room temperature
1 tablespoon chopped fresh parsley plus 3 large sprigs
1 tablespoon chopped fresh thyme, plus 3 large sprigs
1 tablespoon chopped fresh rosemary, plus 3 small sprigs
1/2 teaspoon sea salt or other coarse salt

1 roasting chicken, about 7 pounds, rinsed and patted dry
4 medium onions, peeled and quartered
14 garlic cloves, peeled

1 cup chicken stock or broth
1/2 cup white wine
1 1/2 teaspoons all-purpose flour

Mix the butter, chopped herbs and 1/2 teaspoon sea salt in a bowl, and blend well. If not using right away, refrigerate, but have the butter at room temperature when preparing the bird.

Preheat the oven to 400 degrees Fahrenheit. Sprinkle the cavity of the bird liberally with salt and pepper. Place half an onion, a couple garlic cloves and the herb sprigs inside the cavity of the chicken.

Place the chicken on a rack inside a large roasting pan. Spread about 2 tablespoons of the herbed butter underneath the skin of the chicken over the breast meat. Spread about 3 tablespoons of the herbed butter over the chicken skin, and truss the legs together. Sprinkle salt and pepper over the butter mixture. Scatter the remaining onions around the chicken.

Roast the chicken for 30 minutes. Scatter the remaining garlic cloves around the chicken, and brush the chicken, onions and garlic with some of the remaining herbed butter, reserving about 2 tablespoons for the sauce. Roast the chicken for another 60 minutes, occasionally basting with more of the herbed butter, until the internal temperature of the chicken thigh is 180 degrees Fahrenheit. The chicken should be golden brown at this point.

Remove the chicken to a serving platter, and tent with foil to keep warm.

Drain the drippings into a saucepan, including any browned bits at the bottom of the roasting pan. Add the chicken stock and white wine to the saucepan. Stir the 1 1/2 teaspoons of flour into the reserved 2 tablespoons of herbed butter to make a paste. Add the paste to the sauce, and whisk until combined. Simmer the sauce over medium heat until slightly thickened, about 5 minutes. Season to taste with salt and pepper.

Serve the sauce over the chicken.